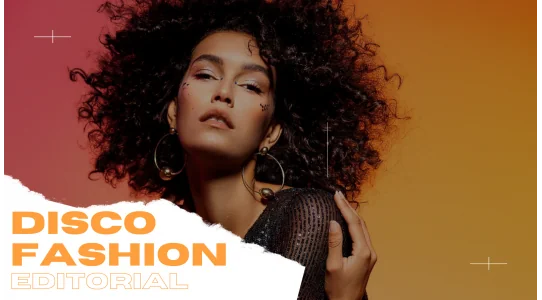
How to photograph fashion and have fun doing it
Fashion photography has always interested creative photographers. It is a field that combines portraiture as well as product, with conceptual and artistic elements seamlessly blended in. Fashion photography itself also has many forms. From simple catalog photos like lookbook, e-commerce, to portraits, agency photos, advertising campaigns and editorials.
Today we will focus on the editorial. The essence of fashion photography is a story, and editorial, consisting of a story presented on a few / several pictures, allows to show that there was an idea behind the photoshoot, that the mood was properly built, and it was not just a collection of several random shots.
But the most important thing during the photoshoot is to have fun! Check out what it looks like to work on a set while creating a fashion editorial - this time to the rhythm of disco.
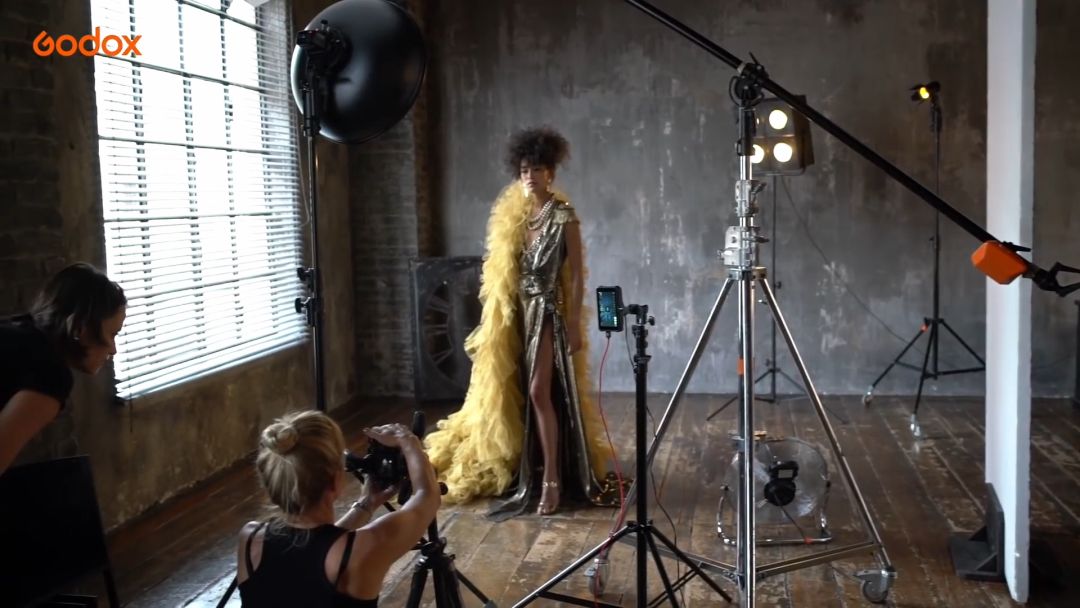
The Godox team, together with photographer Sarah Edmunds, will take us to the European capital of fashion, Milan. In the industrial interiors of the Cross studio, Godox flashes will help us capture the mood of the 80's. For this shoot we will be using:
A good photographer is always well prepared. Take care of these few aspects and your shoot is sure to be a success!
-
Get Inspired. Inspiration is not copying, by getting to know the work of other artists, it will be easier for you to find the elements you want to see in your photoshoot, what you like, what you prefer to avoid, and what will be key to your project. Make a notebook with your ideas/inspirations. Don't limit yourself to just photography! Music, film, painting can also inspire your session.
-
Once you have a finished idea, try to visualize it. Create a moodboard to help communicate your vision to your entire creative team. A storyboard, on the other hand, will allow you to always have a backup plan in case you temporarily run out of shot ideas.
-
Learn the basics of camera operation and studio equipment. Even if you're not interested in the technical aspects of photography, knowing how to get the desired effect will give you more creative freedom. It will also save time during the session and build more confidence in your team.
-
Lighting creates mood. Learn how to use light efficiently, and you won't just rely on what you encounter. It will be helpful to study photos (especially backstage), watch tutorial videos (we recommend our YouTube channel) or experiment on your own before the session on your family/friends with light setting, modifiers selection etc.
-
Ensure a comfortable environment at the session. As a director you have to take care of the safety, but also the good atmosphere of your team. Take the time to get to know the model, listen to her ideas, don't just focus on the camera and its viewfinder. Talk and listen. Provide time for relaxation during the session.
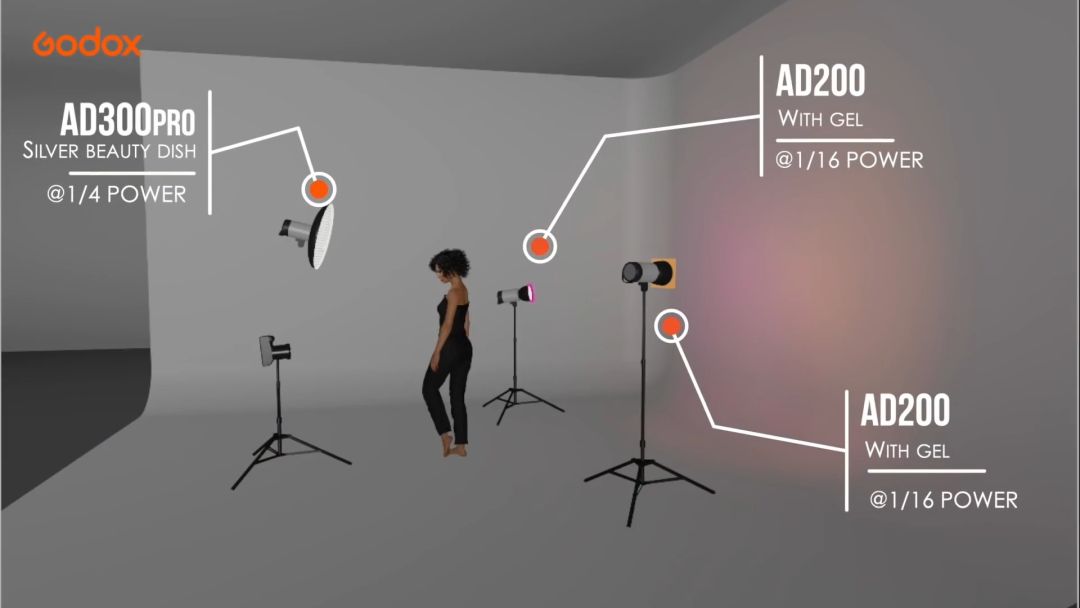
Setup #1
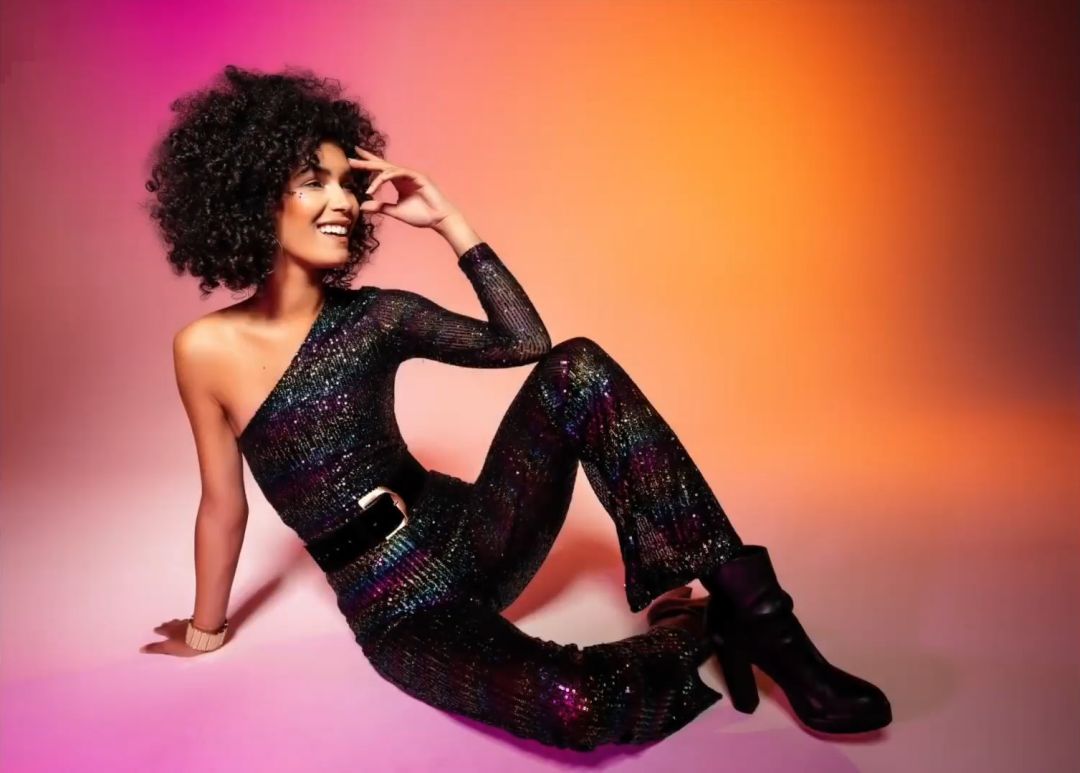
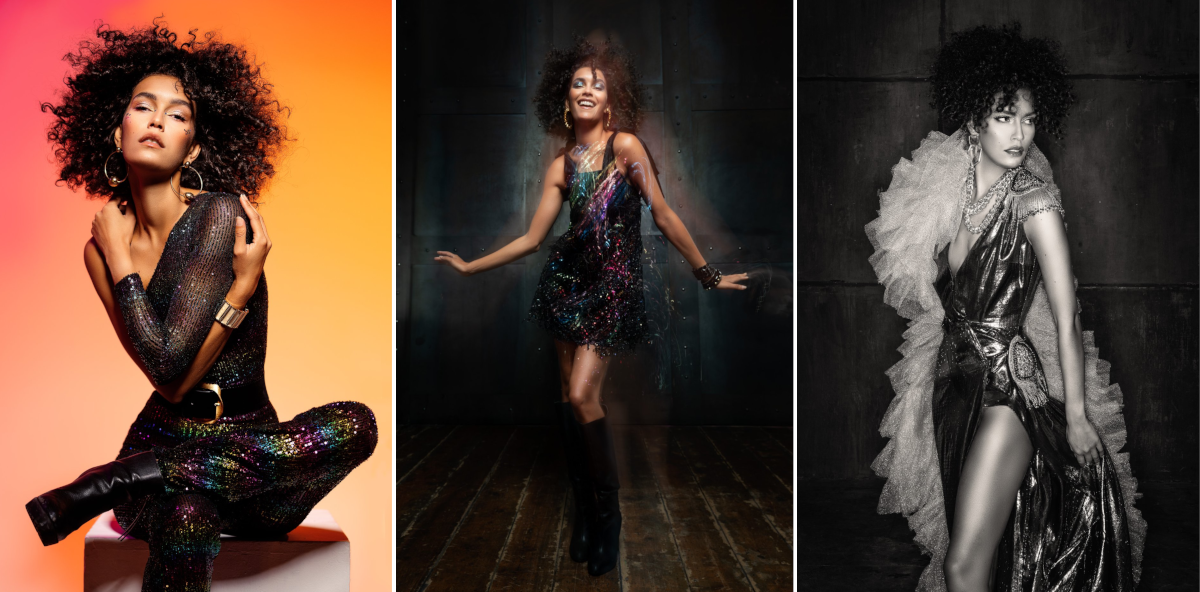
Colour Disco
AD100Pro + color filters, AD200, AD300Pro + Beauty Dish
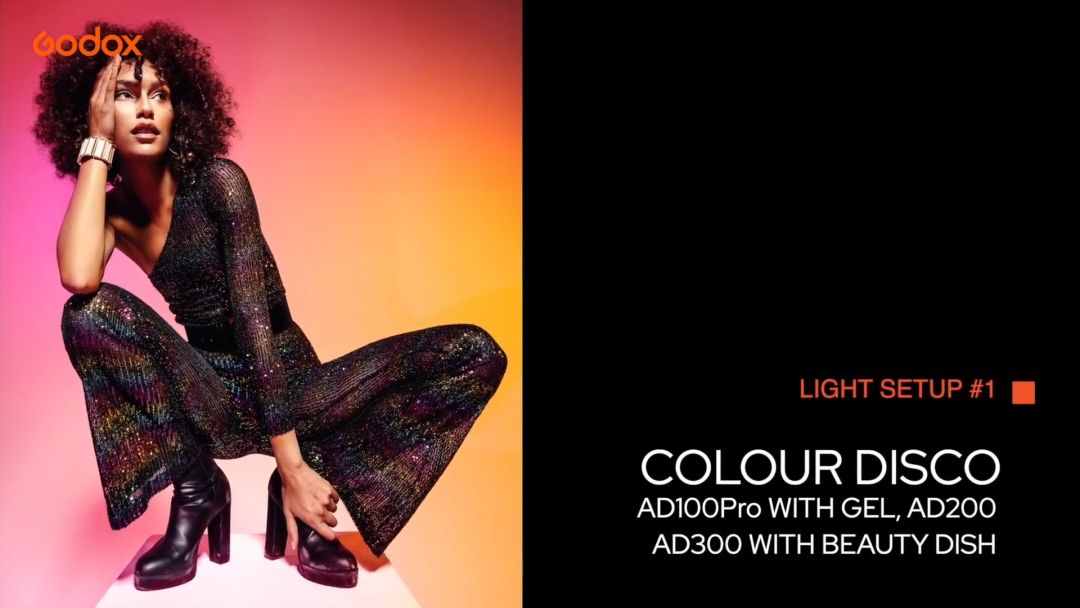
We used a white cyclorama as a background. We chose an AD300Pro with a silver beauty dish as the main light. We also set up 2 AD200 lights with round heads to light the background. Without them the background would have been gray. However, the first effects we got were not satisfying. We were missing that colorful 80's vibe. We took inspiration from our model's colorful hairstyle and added color filters to the AD200 lights and magic happened! The photos came to life and fit perfectly into our concept.
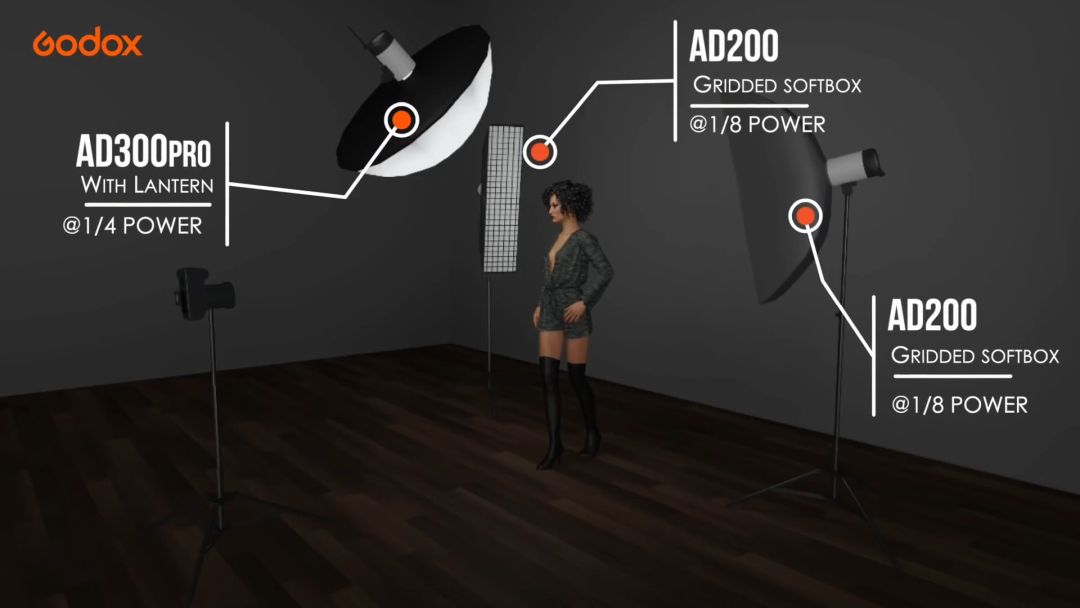
Setup #2
Dark Disco
AD100Pro + color filters, AD200 + softbox, AD300Pro + sphere softbox
This time we attached a rectangular softbox to the AD200 and set it to create a counter light to our model, this allowed us to separate the model from the background. The AD300 was still used as the main light but this time we replaced the beauty dish with a spherical softbox, giving a very soft and diffused light. In order to stay in the mood of the 80's style we asked the model to make her posing more dynamic - music can be helpful in that, as it will make it easier for the model to fit into the dance mood. We decided to increase the shutter speed to 1s and set the synchronization to the second curtain. As a result, we got streaks of light and the impression of movement, but the person was still sharp, thanks to the flash, which "freezes" the movement.
Setup #3
Glamour Disco
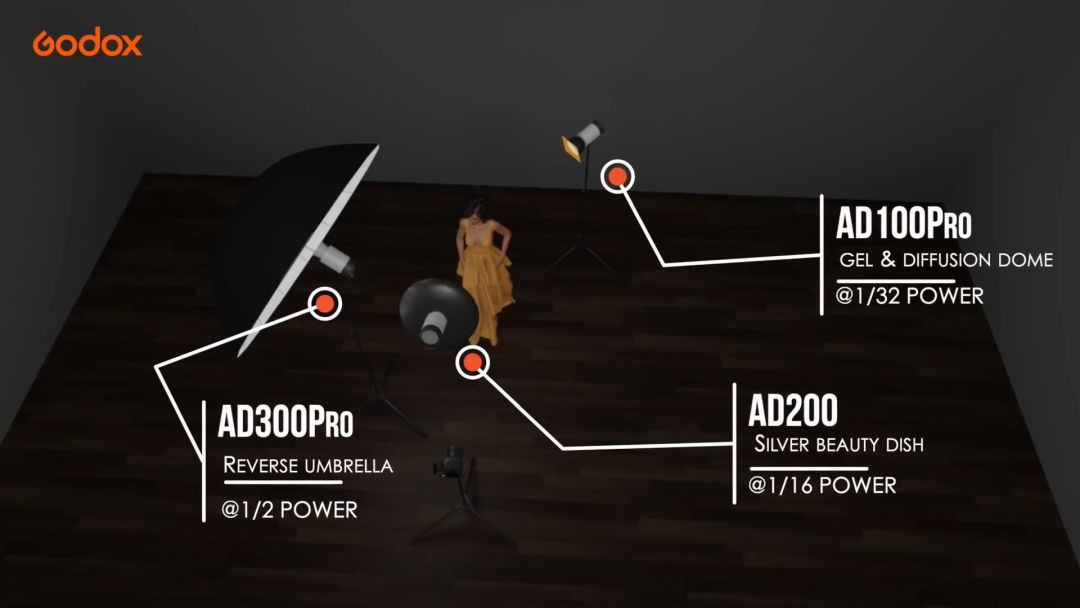
AD100Pro + CTO and grid, AD200 + Beauty Dish, AD300Pro + umbrella
The AD300Pro flash with a large parabolic umbrella was used to illuminate the whole figure in the third scheme. In this case AD100Pro and AD200 acted as effect lights. The AD100Pro with a warming filter simulated the lighting from the lamp visible in the background (which gave too little light to have a significant impact on the photo). The AD200 with the beauty dish did not dominate the shot, but helped to add even more interest in the shot by casting a glow on the model's face.
Setup #4
Glamour Disco with one light
AD1200Pro + Ring Flash
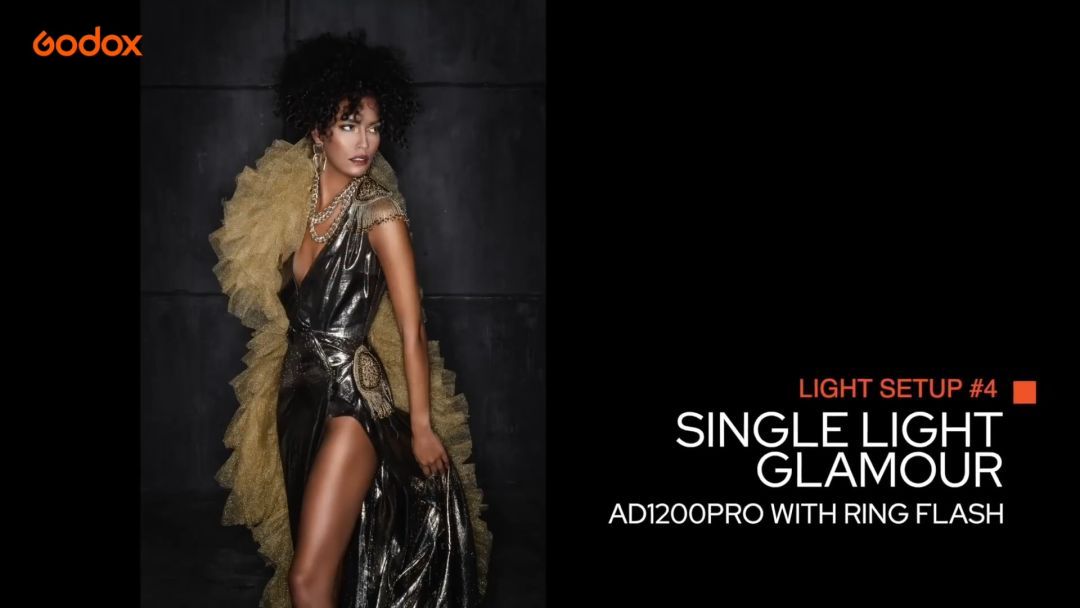
For the last setup on this shoot, we decided to experiment with just one light source. For this we used a powerful AD1200Pro flash with a Ring Flash head. Mounted on the camera lens it gave us a very strong and contrasting light. It made the model look almost like a star caught on the red carpet! The Ring Light can also be placed on a tripod or have an assistant shine it from anywhere on set, giving you access to multiple ways of lighting.
All comments